Global Variables
Global variables allow users to manage a project's parameters and variations efficiently. By defining properties as variables, they can be updated in one central place, applying the changes automatically across the entire user interface. This guide explains how to create, categorize, and manage global variables using the updated Variable Manager.
Panel Overview
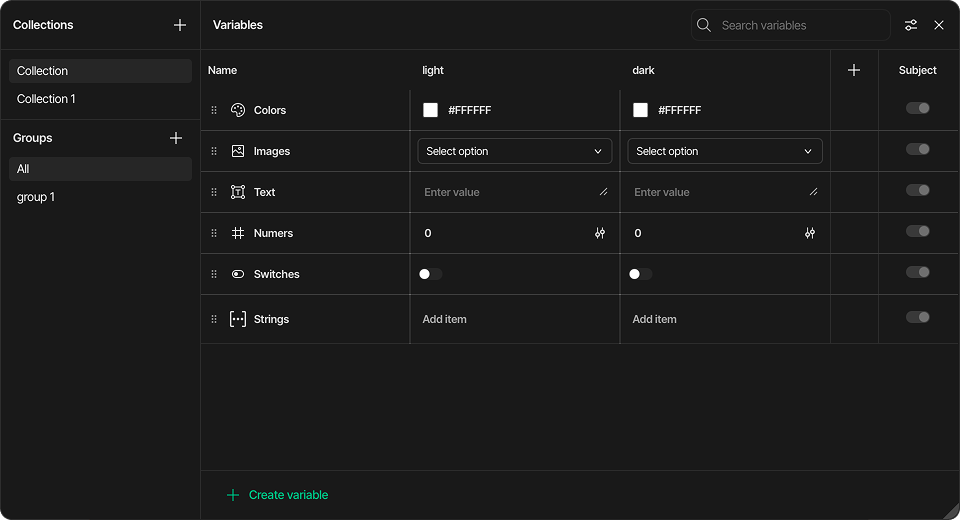
The Variable Manager is located in the Inspector panel. The interface provides advanced tools for structural organization, keyword filtering, and multi-variation tracking.
Structural Organization
The left sidebar introduces a multi-tiered system to keep complex projects organized:
-
Collections: Created by clicking the plus (+) icon next to the section header, allowing you to separate variables into high-level environments.
-
Groups: Created by clicking the plus (+) icon next to the section header within a selected collection, enabling you to sub-categorize variables for narrower scopes.
Variable Grid Controls
The central data grid displays your variables along with their parameters:
-
Search variables: A dedicated search bar at the top right of the grid allows you to instantly filter through defined variables by name.
-
Reorder handles: The drag-and-drop icon located to the left of each variable row allows you to manually sort the list hierarchy.
-
Subject switches: Dedicated toggle options on the far right column allow you to configure individual variable subjects independently.
Managing Variables and Variations
Creating a Variable
-
Select your target Collection and Group from the left sidebar.
-
Click the Create variable button located at the bottom of the data grid.
-
Provide a name and select the appropriate type for the new variable row.
Managing Variations
Variables support side-by-side configurations across multiple project variations (such as variation 1 and variation 2), making it easy to track theme-specific values:
-
To add a new project look or state configuration, click the plus (+) icon on the variation header row.
-
Modify individual cell entries under each variation column to update how that variable reacts when the interface environment shifts.
Supported Variable Types
The grid layout accommodates seven variable formats:
-
Color: Controls solid values or smooth gradient transitions for style parameters like backgrounds or borders.
-
Image: Centralizes graphics, icons, or branding image asset links for quick swapping across variations.
-
Text: Stores content strings to streamline UI label updates and prepare text fields for localization workflows.
-
Number: Holds explicit numeric constants to synchronize layout padding, dimensions, or progress caps across widgets. The configuration icon in the value cell opens the Set number range popover, where a Minimum and a Maximum can be defined for the variable and its number Type (Auto, Integer, Float or Double) can be selected.
-
Boolean: Implements true/false logical switches to dynamically toggle flags or states on specific UI components.
-
Array: Clusters a sequence of text options together to directly populate multi-option selectors such as dropdowns, rollers, or spinboxes.
-
Font: References one of the fonts created in the Fonts panel. The value cell lists the fonts together with their pixel size, and the variable can be bound to any font setting: the Font parameter of the Text style, the axis fonts of the Chart widget or exposed component properties. This way the typography of the whole interface can be switched per variation.
Referencing Other Variables
A variable value does not have to be a literal: a cell can reference another variable of the same type. The referencing variable then always follows the value of the referenced one.
-
Hover over a value cell in the grid and click the plus (+) icon that appears in its corner.
-
Pick the variable to reference from the list. Only variables of the same type are offered; the variable itself and the variables that already depend on it are excluded to prevent circular references.
-
The cell displays the name of the referenced variable as a badge, together with a preview of the resolved value.
References are stored per variation column, so a variable can follow different variables in different variations. To remove a reference, hover over the badge and click the minus (-) icon: the cell keeps the currently resolved value as a literal. A badge shown in red marks a broken reference, for example a Missing variable whose target no longer exists.
When a variable or a collection that other variables reference is deleted, a confirmation dialog shows how many variables are affected; after the deletion, the references are replaced by the current values.
Resolution Collection
When a project has more than one display resolution, the Variable Manager contains a system collection named Resolution. Its columns are the resolutions of the project (named automatically after their size, e.g. 800×480), and any variable created in this collection can hold a different value for every resolution. The collection and its columns are managed from the Display settings, so they cannot be renamed or deleted in the manager. See Multiple resolutions for details.
Switching Themes
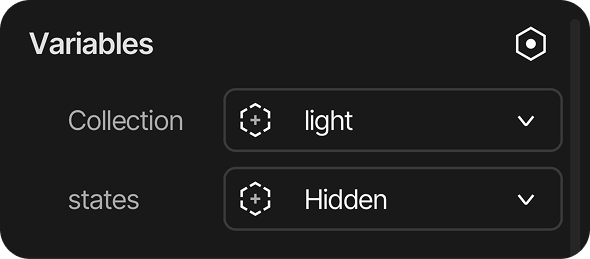
After configuring themes and assigning color variables to elements, users can easily switch between them in the inspector panel. This allows the UI's appearance with different themes to be previewed in real-time, directly within the editor, making it easy to fine-tune your color choices instantly.
Bonus Tip
A theme change can also be triggered by an event. Simply add a new Event to an element (like a button) and select the Switch Theme action from the Actions list. This allows the entire UI's theme to be changed dynamically.
Summary
The Variable Manager minimizes layout adjustments by handling project properties through structured nodes. Sorting data into designated collections and groups ensures clear variable management even as project complexity scales. There's no more need to manually find and replace values across the interface; simply update the variable's value, and the change is applied everywhere automatically.