Fonts
The Fonts panel provides comprehensive tools for managing and customizing fonts in the embedded GUI. This guide explains how to use these features effectively.
Overview
The Fonts panel allows users to:
- Create custom font styles from TTF files
- Configure font properties (size, bit-per-pixel, character ranges)
- Manage existing font styles
- Customize which characters are included to optimize memory usage
Initial state
If no custom fonts have been created, font styles can still be generated using the default Montserrat Regular and Montserrat Bold fonts included with SquareLine Vision, which are immediately available for use in the project.
Adding fonts
Before creating font styles, TTF files must be uploaded to the project assets:
- Place TTF font files in the Assets folder of the project or click the "+" button in the top-right corner of the Assets panel
- The TTF font files will appear in the panel
Creating a new font
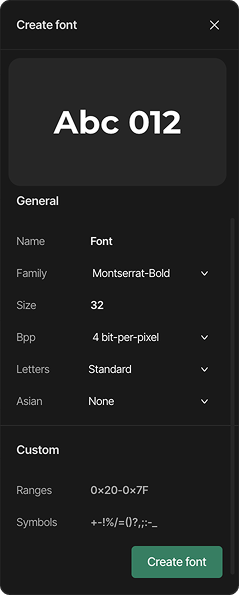
Clicking the "+" button, the "Create font" dialog appears with the following options:
General settings
-
Name: Assign a name to the font style (default is "Font")
-
Family: Select from available font families uploaded to your assets (dropdown menu)
-
Size: Set the font size in pixels (e.g., 32)
-
Bpp (Bit-per-pixel): Select from options:
- 1 bit-per-pixel (basic, no anti-aliasing)
- 2 bit-per-pixel (basic anti-aliasing)
- 4 bit-per-pixel (better anti-aliasing, default)
-
Letters: Choose which Latin alphabet character sets to include:
- Standard (basic Latin characters)
- Lowercase (only lowercase letters)
- Uppercase (only uppercase letters)
- Extended (extended Latin characters with accents)
-
Asian: Select Asian language support:
- None (default)
- Korean
- Chinese
- Japanese
- CJK (Chinese, Japanese, Korean combined)
Custom settings
- Ranges: Define custom Unicode ranges in hexadecimal format
- Example:
0x20-0x7F(Basic Latin) - Default:
0x20-0x7F(standard ASCII printable characters)
- Example:
- Symbols: Specify individual characters to include
- Example:
+-!%/=()?,;:-_(common symbols)
- Example:
Creating the font
After configuring all settings, click the green "Create font" button at the bottom of the dialog to generate the font style.
Managing existing fonts
Once created, fonts appear in the Fonts panel:
Each font entry shows:
- Font name
- Font size
- Adjustment icon
- Minus (-) icon to remove

Modifying fonts
To modify an existing font:
- Click the adjustment icon
- The "Modify font" dialog appears with the same options as the creation dialog
- Make the desired changes and click "Modify font"
Deleting fonts
To delete a font style:
- Hover over a created font
- Click the minus (-) button
Best practices
- Memory Optimization: Only include character ranges that the application will actually use
- Performance Considerations: Higher Bpp values provide better quality but require more processing power
- Font Size: Choose appropriate sizes based on the target device's display resolution
- Character Sets: For multilingual applications, be sure to include all necessary character ranges
Technical notes
- SquareLine Vision uses LVGL's font converter to generate optimized font assets
- Font styles are compiled into the project as C arrays
- The software uses UTF-8 encoding for Unicode character support
- Custom ranges are particularly useful for memory-constrained embedded systems
Careful font configuration helps balance aesthetics, performance, and memory usage in UI projects.